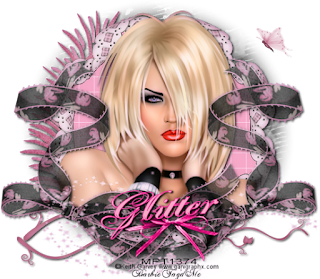
Tickled Pink Star
Supplies
1. I am using the stunning art of Keith Garvey ,new release " Star " HERE
2. WeeScottLass Mask # 60 HERE
3. Tickled Pink PTU Scrapkit by BabyCakesScraps HERE
4. Supplies HERE
5. Font of choice
6. Xeo Filter Porcelain HERE
7. Grid Generator HERE
** Hints **
Drop shadow settings : Vertical 3, Horizontal 2, Blurr 4.00, Opacity 100, Color Black
BabyCakes Tickled Pink Scrapkit is on sale , and is referred to as BCS kit in this tut
! Let's Get Started !
1. Open a new image in PSP , tick the transparent box in window, size 550 x 480 pixels. Flood fill image with black . Open WSL mask # 60 and resize to 90%. Adjust > sharpen. Layers > new mask layer > from image. Copy and paste onto flood filled new image " as new layer ". Layers > merge visible. Delete original mask file.
2. Open vine doodle from BCS kit , resize by 90%. Image > rotate> right . Copy and paste onto tag " as new selection " so that left side of vine is 2 blocks from left side of tag and 2 blocks from bottom of tag. Effects > 3D effects > drop shadow. Selections > select none.
3. Open feather from BCS kit . Image > mirror . Resize to 85% . Edit > repeat resize . Adjust > sharpen. Copy and paste onto left side of mask/tag " as new selection ". Position as shown, tip of feather should be one block from top of tag, tip of the widest part of feather should be 2 blocks off left side of tag. Effects > 3D effects> drop shadow. Selections > select none .
4. Open BCS lace frame from kit . Resize to 40%. Adjust > sharpen . Set materials palette to #f7a8c8 foreground and background color. Get magic wand left click inside frame > marching ants > selections > modify > expand by 1.00. Flood fill area. Effects > plugins > Grid Generator. Use these settings : 13,13,4,0, Background color #8a9c9 ,Grid color white .Click OK. Selections > select none . Copy and paste frame onto tag " as new layer " Effects> 3D effects> drop shadow > layers > merge visible.
5. Open Keith Garvey tube " Star ". Close off all layers in layers palette except head/shoulders . Highlight this layer in layers palette. Copy > paste as new image . Delete tube . Resize image by 90% or to your preference. Do not sharpen. Using eraser brush ( round size 32) carefully erase bottom edge of tube in curved fashion, careful not to remove too much . Copy and paste Garv tube into frame " as new selection", position as shown. Effects > 3D effects > drop shadow. Selections > select none.
6. Open fancy bow from BCS scrapkit . Resize by 85% . Edit >repeat resize 3 more times. Adjust > sharpen. Copy and past onto right side of tag " as new selection" , position as shown 1/2 block from right side of tag , and covering bottom of Garv tube at shoulder. Selections > select none. Left click on fancy bow again > image > mirror . Copy and paste onto left side of tag " as new selection" and position as shown, staying 1/2 block off of left side of tag and overlapping fancy bow from right side of tag. Selections > select none.
7.Open glow tube from BCS scrapkit. Image > rotate right . Resize image by 60%. Adjust > sharpen . Using pick tool, left click on glow . Move edge of image down 3 blocks from top and 3 from bottom to shrink image. Deselect tool . Adjust sharpen. Copy and paste onto tag across bottom of tag " as new selection" , positioning as shown. Selections > select none.
8. Open bow 2 from BCS kit . Image > resize by 85%. Edit > repeat resize four times. Adjust > sharpen. Copy and paste bow onto bottom of frame in tag " as new selection ". Be sure bow covers bottom of Garv tube to hide edges. Selections > select none.
9. Open spaghetti bow from supplies . Copy and paste onto center of bow 2 " as new selection ". Effects > 3D effects > selections > select none.
10. Open butterfly from supplies. Copy and paste " as new selection " onto upper right area of tag as shown . Do not drop shadow. Selections > select none.
11. Effects > plugins > xero > porcelain . Use these settings > Strength and softness 50 each. Red 62, Green 0, Blue 42, all other settings 0. Click OK.
12. Add proper credits and save as PNG file.
Thank you for trying my tutorial !! Tag and tutorial are solely my creations and were created by me on 9/3/10. Please do not copy, reproduce or claim as your own. Do not hotlink or post link to any website, blog, forum or group without my permission.


No comments:
Post a Comment