
Happy Thanksgiving
( Animated Holiday Tag )
( Animated Holiday Tag )
Supplies
1. I am using the stunning art of Barbara Jensen, tube can be found HERE
2. I am using the lovely kit by Carita called "Giving Thanks" , you can check to see if the kit is still available by contacting Carita
3. WeeScotLass Mask # 254 download free here
4. Animation shop and PSP .
5. Xero filter - porcelain
** Hints **
Drop shadow settings : Vertical 2, Horizontal 1, Blurr 4.00, Opacity 100, color black.
** NOTE** To be successful with this tutorial you must have working knowledge of animation shop
Let's Get Started
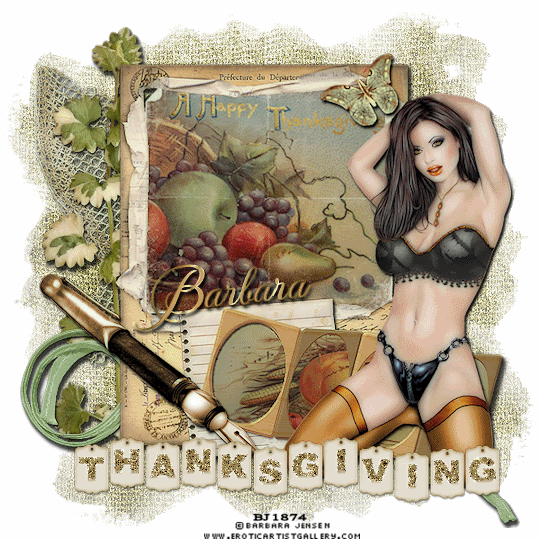
1. Open a new image in PSP. ( file > open) , 600 x 600 pixels, tick the transparent box . Open paper # 5 from kit and resize to 85%. Adjust > sharpen. Copy and paste paper onto new file " as new layer ". Layers > Merge visible. Open WSL mask # 254 . Layers > new mask layer > from image . Copy and paste new mask layer onto paper " as new layer " Layers > merge visible. Delete original WSL mask . Resize tag to 90%. Adjust > sharpen. > Layers > duplicate . In layers palette close off top layer . Highlight bottom layer > Adjust > Add/Remove Noise > add noise settings : Random 35 , Tick monochrome.Click OK. Copy layer into animation shop " as new animation" . Close off bottom layer in psp. Open top layer in psp .Highlight layer . Adjust > Add/Remove noise > add noise settings : Random 45, tick monochrome , click ok .Copy and paste top layer into animation shop " after current frame " so you have two frames in animation shop .
2. Open a new file in psp , color white , size 600 x 600 pixels . Image > resize to 90%. Copy and paste into animation shop " as new animation" . Right click and duplicate once.
3. In animation shop , left click on first frame of green paper > edit > select all > edit > copy . Left click on frist frame of white background > edit > select all > edit > paste " into selected frame " . View > animation to check proper completion , then close viewed image leaving merged frames open.
4. In psp > open new file , tick the transparent box , size 600 x 600. Open mesh from Carita's kit and copy and paste onto left side of tag " as new selection" and position as shown staying one block from side and in 3rd block from top of tag > selections > select none ( do not drop shadow) .
5. Open tendril from kit . Copy and paste onto left side of tag " as new selection" and position as shown , top of tendril should be in 1st block from the top and in 6th block from the left side of tag , overlaying the mesh as shown. Effects > 3D effects > drop shadow > selections > select none.
6. Open ribbon # 2 from kit . Copy and paste " as new selection" onto tag and position as shown in first block from left and in 6th and 7th blocks from bottom of tag . Effects > 3D effects > drop shadow > selections > select none.
7. Open frame # 2 from kit . Resize to 95%. Open old photo 1 from kit . Image > resize to 85%> edit > repeat resize > adjust > sharpen . Get magic wand > Left click inside frame # 2 > marching ants > selections > modify > expand by 2. Copy and paste old photo 1 " into selection" > selections > select none. Copy and paste frame onto tag " as new selection " and position as shown 3-4 blocks from top of tag and 7-8 blocks from left side of tag , check my tag for example. Effects > 3D effects > drop shadow > selections > select none.
8. Open frame # 3 from kit. Image > resize to 85% > edit > repeat resize 2 times more. Adjust > sharpen. Get magic wand > holding down shift key left click inside each frame inside frame > all four frames marching ants > selections > modify > expand by 3 > leave marching ants . Open old photo # 3 from kit . Using selection tool, starting in top left corner below frame, pull down and leftward excluding the frame on the image > marching ants > edit > Copy and paste " into selection" > selections . select none. Copy and paste frames onto tag " as new selection" and position as shown , keep bottom right edge of frame 3 blocks off of right side of tag and in 5th block from bottom of tag > effects > 3D effects > Drop shadow > selections > select none.
9. Open butterfly from kit . Image > resize to 85% > edit > repeat resize 4 times more > adjust > sharpen. Image > free rotate > 30 % , tick left . Copy and paste " as new selection " onto upper right corner of frame # 2 on tag > effects > 3D effects > drop shadow > selections > select none.
8. Open Barb Jensen tube from pack # 5 and close off layes of choice. Highlight main tube in layers palette. Image > resize to 85%. Copy and paste onto tag " as new selection" and position as shown. Top of head of tube should barely touch bottom of butterfly and elbow visually on the left should be inside frame, knees should be at bottom of frames at bottom of tag. Effects > 3D effects > drop shadow > change settings to vertical 3, horizontal 2 > selections > select none.
9. Resize tag to 90% > Adjust > sharpen. > effects > plugins > porcelain . Use these settings > Softness 30, strength 40, Red 0, Green 50, Blue 10 > click OK . Copy tag > paste into animation shop " as new animation" Right click > duplicate . You should have two frames. Left click on first frame > edit > select all > edit > copy . Left click on first frame of base tag in animation shop > edit > select all > edit > paste into selected frame and position as shown, centered on paper.
10.. In psp Open wordart 1 from kit Effects > 3D effects > drop shadow . Copy , paste as new image and delete original > layers > duplicate. Get magic wand > holding down shift key, click inside each letter of word art > marching ants > selections > modify > expand by one. In layers palette close off top layer > highlight bottom layer . Highlight bottom layer > Adjust > Add/Remove Noise > add noise settings : Random 35 , Tick monochrome.Click OK. Copy layer into animation shop " as new animation" . Close off bottom layer in psp. Open top layer in psp .Highlight layer . Adjust > Add/Remove noise > add noise settings : Random 45, tick monochrome , click ok .Copy and paste top layer into animation shop " after current frame " so you have two frames in animation shop . Left click on first frame > edit > select all > edit > copy . Left click on first frame of base tag in animation shop > edit > select all > edit > paste into selected frame and position as shown, the "t" should be beneath green ribbon and the " g" should cover knee of Barb Jensen tube as shown.
11. Open pen in psp. Image > resize to 85% > edit > repeat resize . Image > mirror > adjust > sharpen.Effects > 3D effects > drop shadow . Copy and paste into animation shop " as new animation " . Right click > duplicate .. Left click on first frame > edit > select all > edit > copy . Left click on first frame of base tag in animation shop > edit > select all > edit > paste into selected frame and position as shown
12. Copy credits into animation shop and duplicate so you have two frames . Left click on first frame > edit > select all > edit > copy .. Left click on first frame > edit > select all > edit > copy. Left click on first frame of base tag in animation shop > edit > select all > edit > paste into selected frame and position as shown,.
Thank you for trying my tutorial ! This tag and tutorial were created by Barbie L on 11/21/10 and both are solely my creations . Do not copy, reproduce nor claim as your own . Do not post to any website , forum , blog or group without my permission.
4. Animation shop and PSP .
5. Xero filter - porcelain
** Hints **
Drop shadow settings : Vertical 2, Horizontal 1, Blurr 4.00, Opacity 100, color black.
** NOTE** To be successful with this tutorial you must have working knowledge of animation shop
Let's Get Started
1. Open a new image in PSP. ( file > open) , 600 x 600 pixels, tick the transparent box . Open paper # 5 from kit and resize to 85%. Adjust > sharpen. Copy and paste paper onto new file " as new layer ". Layers > Merge visible. Open WSL mask # 254 . Layers > new mask layer > from image . Copy and paste new mask layer onto paper " as new layer " Layers > merge visible. Delete original WSL mask . Resize tag to 90%. Adjust > sharpen. > Layers > duplicate . In layers palette close off top layer . Highlight bottom layer > Adjust > Add/Remove Noise > add noise settings : Random 35 , Tick monochrome.Click OK. Copy layer into animation shop " as new animation" . Close off bottom layer in psp. Open top layer in psp .Highlight layer . Adjust > Add/Remove noise > add noise settings : Random 45, tick monochrome , click ok .Copy and paste top layer into animation shop " after current frame " so you have two frames in animation shop .
2. Open a new file in psp , color white , size 600 x 600 pixels . Image > resize to 90%. Copy and paste into animation shop " as new animation" . Right click and duplicate once.
3. In animation shop , left click on first frame of green paper > edit > select all > edit > copy . Left click on frist frame of white background > edit > select all > edit > paste " into selected frame " . View > animation to check proper completion , then close viewed image leaving merged frames open.
4. In psp > open new file , tick the transparent box , size 600 x 600. Open mesh from Carita's kit and copy and paste onto left side of tag " as new selection" and position as shown staying one block from side and in 3rd block from top of tag > selections > select none ( do not drop shadow) .
5. Open tendril from kit . Copy and paste onto left side of tag " as new selection" and position as shown , top of tendril should be in 1st block from the top and in 6th block from the left side of tag , overlaying the mesh as shown. Effects > 3D effects > drop shadow > selections > select none.
6. Open ribbon # 2 from kit . Copy and paste " as new selection" onto tag and position as shown in first block from left and in 6th and 7th blocks from bottom of tag . Effects > 3D effects > drop shadow > selections > select none.
7. Open frame # 2 from kit . Resize to 95%. Open old photo 1 from kit . Image > resize to 85%> edit > repeat resize > adjust > sharpen . Get magic wand > Left click inside frame # 2 > marching ants > selections > modify > expand by 2. Copy and paste old photo 1 " into selection" > selections > select none. Copy and paste frame onto tag " as new selection " and position as shown 3-4 blocks from top of tag and 7-8 blocks from left side of tag , check my tag for example. Effects > 3D effects > drop shadow > selections > select none.
8. Open frame # 3 from kit. Image > resize to 85% > edit > repeat resize 2 times more. Adjust > sharpen. Get magic wand > holding down shift key left click inside each frame inside frame > all four frames marching ants > selections > modify > expand by 3 > leave marching ants . Open old photo # 3 from kit . Using selection tool, starting in top left corner below frame, pull down and leftward excluding the frame on the image > marching ants > edit > Copy and paste " into selection" > selections . select none. Copy and paste frames onto tag " as new selection" and position as shown , keep bottom right edge of frame 3 blocks off of right side of tag and in 5th block from bottom of tag > effects > 3D effects > Drop shadow > selections > select none.
9. Open butterfly from kit . Image > resize to 85% > edit > repeat resize 4 times more > adjust > sharpen. Image > free rotate > 30 % , tick left . Copy and paste " as new selection " onto upper right corner of frame # 2 on tag > effects > 3D effects > drop shadow > selections > select none.
8. Open Barb Jensen tube from pack # 5 and close off layes of choice. Highlight main tube in layers palette. Image > resize to 85%. Copy and paste onto tag " as new selection" and position as shown. Top of head of tube should barely touch bottom of butterfly and elbow visually on the left should be inside frame, knees should be at bottom of frames at bottom of tag. Effects > 3D effects > drop shadow > change settings to vertical 3, horizontal 2 > selections > select none.
9. Resize tag to 90% > Adjust > sharpen. > effects > plugins > porcelain . Use these settings > Softness 30, strength 40, Red 0, Green 50, Blue 10 > click OK . Copy tag > paste into animation shop " as new animation" Right click > duplicate . You should have two frames. Left click on first frame > edit > select all > edit > copy . Left click on first frame of base tag in animation shop > edit > select all > edit > paste into selected frame and position as shown, centered on paper.
10.. In psp Open wordart 1 from kit Effects > 3D effects > drop shadow . Copy , paste as new image and delete original > layers > duplicate. Get magic wand > holding down shift key, click inside each letter of word art > marching ants > selections > modify > expand by one. In layers palette close off top layer > highlight bottom layer . Highlight bottom layer > Adjust > Add/Remove Noise > add noise settings : Random 35 , Tick monochrome.Click OK. Copy layer into animation shop " as new animation" . Close off bottom layer in psp. Open top layer in psp .Highlight layer . Adjust > Add/Remove noise > add noise settings : Random 45, tick monochrome , click ok .Copy and paste top layer into animation shop " after current frame " so you have two frames in animation shop . Left click on first frame > edit > select all > edit > copy . Left click on first frame of base tag in animation shop > edit > select all > edit > paste into selected frame and position as shown, the "t" should be beneath green ribbon and the " g" should cover knee of Barb Jensen tube as shown.
11. Open pen in psp. Image > resize to 85% > edit > repeat resize . Image > mirror > adjust > sharpen.Effects > 3D effects > drop shadow . Copy and paste into animation shop " as new animation " . Right click > duplicate .. Left click on first frame > edit > select all > edit > copy . Left click on first frame of base tag in animation shop > edit > select all > edit > paste into selected frame and position as shown
12. Copy credits into animation shop and duplicate so you have two frames . Left click on first frame > edit > select all > edit > copy .. Left click on first frame > edit > select all > edit > copy. Left click on first frame of base tag in animation shop > edit > select all > edit > paste into selected frame and position as shown,.
Thank you for trying my tutorial ! This tag and tutorial were created by Barbie L on 11/21/10 and both are solely my creations . Do not copy, reproduce nor claim as your own . Do not post to any website , forum , blog or group without my permission.
No comments:
Post a Comment